Tuesday, 25 October 2016

                                       Bonnet fitting time   www.aerocyclecars.com

As an introduction though, why not go to the Blog overview first.


I have the bonnet halves cut and louvred on a CNC Trumph machine, a £250K lump of kit, not mine you understand! Please remember....you do not have to do this, I bend these for you!

I mark each half suitably and owing to the different radii of the nose cone and the scuttle, make the first bend on a specially made cone. (first time I did this I was shitting myself!)


 The second bend is when it becomes exciting, over a 6 inch piece of plastic drain pipe.


A third tweak bend occurs around the nose cone end using a 3 inch drain pipe.

Suitably bent and the ends trimmed accordingly, time to fit the stainless steel hinge.


 Both bonnet halves shown hinged, even the starter body/chassis kit has the bonnets fully formed and hinge fitted. You will have to adjust the nose cone accordingly to reach nice looking shut lines.

  Both halves now laying over the GRP sections.


One side open, but not fitted yet.


The bonnet assembly can be removed easily as a whole by simply unscrewing the fitting shown here on the back of the nose cone.


Under bonnet shot showing petrol cap and bonnet clearance.

Wednesday, 5 October 2016

Fitting  the fuel tank   www.aerocyclecars.com

As an introduction though, why not go to the Blog overview first.


The alloy fuel tank sits up against the front upper bulkhead and is bolted down using M8 bolts, spring washers, washers to the tank support strap on the LHS and the LH pedal box support angle. M8 riv nuts need to be fitted/will have been fitted.


This shot shows the M8 riv nuts being fitted in the rear of the pedal box angled supports. Note the Masterfix ratchet riv nut tool,(also marketed by Wurth) which in my experience is the best manual riv nut tool without doubt...until I find a better one! I also use an air riv nut tool.


I've displayed this shot deliberately as it shows a potential hazard. I almost fell foul of my own mantra as I've not really allowed enough room for the tool when drilling the holes for the riv nut. You can see the tool just touching the steering column plate. One should always anticipate entry and exit of a tool when planning the position of a fixing...easily overlooked though.


Here is the LHS of the tank mounted down through the tank support plate into the tank support strap. The tank needs raising slightly to allow the electrics box cover to just slide under, so I've placed spacer plates under each side. Looking recently at photos of the best client built car, and I always look for details, in my view the above bolts should be replaced with socket cap head bolts.


These last two shots show the tank in position, bolted down with M8 bolts, spring washers and washers. The tank can be removed as can the plate beneath, thus giving additional access into the tunnel. Remember, for LHD, these photos would be reversed.


                        Fitting  the front mud guards/wings/fenders.   www.aerocyclecars.com

As an introduction though, why not go to the Blog overview first.
See SAFETY UPDATE further down re 6mm SCH screw/bolt.


Here is a mudguard complete with all stays fitted. The pictures below show how it is all mounted up.

This shot shows the rear of the mudguard with the upper and lower stays fitted. Please note that a later post shows that one of the stays has now been superceded.


This shot shows the front stay fitted together with the angled spacer. The sequence for assembly of the upper fixture is: M8 55mm SBH (socket button head screw), washer, stay, angled spacer, washer, mud guard, radiused stiffener (already fitted), washer, 8mm nylock nut.


Looking inside the mudguard, the radiused stiffener piece is visible to which the stays are bolted. Note that for the purpose of this picture, nylock nuts are not shown, but must be used in reality.


First thing is to identify the three different lengths of mudguard stay. The radiused stiffener will already have been fitted to the mudguard. The shorter but thicker stay is for the front.


Identify all of the components required for assembly.


This shot shows the 2 rear stays fitted. The sequence is as follows: Identify M8 - M6 stay and M8 - M12 stay. M8 55mm SBH, washer, M8-M6 stay, M8-M12 stay, M8 10 x 16 spacer, washer, mud guard, radiused stiffener, washer, nylock nut.


This shot shows the M6 fitment of the upper stay into the upper position of the alloy upright. The shot below shows this in close up. All bolts/screws into the alloy upright must be held by Locktite or similar.


All bolts/screws into the alloy upright must be held by Locktite or similar.


This shot shows the lower M6 SCH (socket cap head screw) into the forward position. 
All bolts/screws into the alloy upright must be held by Locktite or similar.
Safety Update 24/10/18: The 20mm M6 SCH screw/bolt should be changed to a standard 8.8/12.8 SCH screw/bolt as stainless steel SCH 6mm screw/bolts in this position have been found to shear.


This shot shows the M8-M12 stay bolted into the brake caliper and the alloy upright. The sequence is as follows: M12 SBH 50mm screw, spring washer, stay, M12 25 x 10 alloy spacer, through the caliper into the alloy upright.
All bolts/screws into the alloy upright must be held by Locktite or similar.


Side view of mud guard mounted up.


Rear view of mounted mud guard.

Wednesday, 28 September 2016

                           Fitting  the indicators and rear lights.   www.aerocyclecars.com

As an introduction though, why not go to the Blog overview first.


We are aiming to fit these indicator lamps, firstly to the headlights, bolted through the headlight bowls so that all wiring comes up through the headlights in one bundle. First of all unscrew the cowl and remove the bulb, then from under the shaped plinth, remove the nuts and withdraw the bolt from inside the lamp. Discard the bolt as we'll be using a 60mm M8 hollow thread.


Look down at the head lamp, notice the central M5 socket button head screw. Unscrew this and remove the glass, exposing the bowl interior.


From the centre point of the lamp (screw hole) lay a strip of masking tape, left or right, this photo shows a LH head lamp (as viewed from inside the car). Mark 75mm from the centre point, 12.5mm from the front edge. I use a flexible steel ruler that is precisely 12.5mm wide. A few words about rulers...I use rulers that are 12.5mm, 25mm, 30mm, 40mm and 50mm wide. This ensures that I simply pick up and mark out a width accordingly, the 12.5mm wide ruler is excellent for marking out midway up/down a 25mm chassis box member, then centre punching where one wishes to drill. Now, a few words about drilling thin stainless steel as in this head light bowl....not as easy as it might seem. use a centre punch first, then a small bit as a pilot, plenty of lubrication.


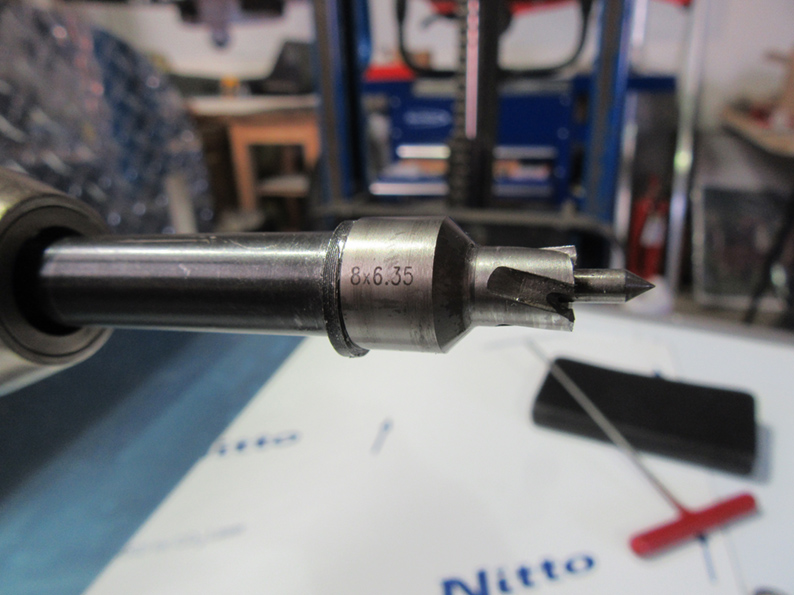
Here is an 8mm rotabroach cutter. These cutters are invaluable, they are mini hole saws. I have sets from 8mm to 20mm, plus a 25mm cutter and they are magnificent. Google ROTABROACH, then go to minicutters. The cutter above is used for drilling the 8mm hole through the headlight bowl cleanly.


Here are components we are going to use. 60mm M8 thread, nylock nut, spring washer, rubber washer, angled piece, then the flange and rubber previously removed, then insert into the headlamp bowl, second angled piece, then spring washer and standard M8 nut.


Here is how we'll bolt it up, remembering that the lowest 3 components are within the headlight bowl once assembled.

Here it is, all bolted up. Adjustment is quite fiddly, so take your time and keep checking it by placing a straight edge across the light bowls of both items. You'll need 2 x 13mm spanners for this and a lot of patience.

You are aiming for this, but there are variations, as we'll see in the next photo. Of course, you could move the measurements round to say 100mm or less, but more than 75mm.

This is the opposite side, but it looks wrong....it is, in my view, so re-position and move the angled pieces and the whole threaded piece in the hole to replicate the other side.

On to the rear lights now. No explanation, just centre punch at the above co-ordinates, and drill 8mm holes carefully.

Similar components as the front indicators, but this time do not use the plinths and rubbers, use the large stainless steel washers front and rear of the main side panels.

We are aiming to fit the components as shown above, but between the large washers is the main side panel of course.

This time you are routing 2 cables through the hollow threaded piece, and it is very tight, so make a screwing motion to guide the 2 cables through, then untwist them.


The fitting seen from inside the main side panel.

Repeat the exercise for the lower brake light/side light, then for the opposite side as well. Remember, take time to get the lamps sitting perfectly then tighten up carefully as the threaded hollow rod can be fragile.


Finally, you'll recall the holes drilled through the exhaust side pipe brackets in an earlier post. back drill through these brackets, then carefully through the side panels. use a piece of scrap in front of the side panel, but beware of your fingers.


Side clamp fitted.