As an introduction though, why not go to the Blog overview first.
www.aerocyclecars.com
01273 843749 07976 312058
Some very inspiring close up shots of a client's car.
www.aerocyclecars.com
01273 843749 07976 312058
Some very inspiring close up shots of a client's car.

This car in my view, ranks as the best client finished car, in fact the best finished car. I now use different alloy uprights/calipers/mudguard stays.

Nice low angle shot. though I'd like to modify the slab fronted rack covering panel into something more reminiscent of an MG J2, so will one day!

I'm seriously into louvres for aesthetics. These are CNC stamped and I bend the bonnet halves. Note the chrome on brass vintage style bonnet catches. The plastic wing mirrors can be changed after the UK MSVA test, perhaps for vintage styled chromed mirrors.

As can be seen, this is a barrelback model, to which a spare front wheel can be attached. The barrelback model was introduced by Morgan in 1936, and all of their F types with side valve Ford engines were barrelback, though I have seen one specially modified into a
Beetleback.

Here is what we mean by barrelback...a bit like a barrel. Different rear side lights could be used. Note the standard Moto Guzzi supplied silencers and simple fittings, though not all silencers are like this. For the UK MSVA test, the rear wheel and aero screens are left off, though they are added once the test has been passed.

Most kits and cars are the beetleback model and a barrelback is a very nice option all round.

Louvres look magnificent!

The client did his own upholstery, although I supplied the bucket seats trimmed. He made his own plywood dashboard though covered the aluminium rear bulkhead panel. The panel is detachable via Dzus fasteners, enabling the whole rear fibreglass cover removable, which is also held down by 4 Dzus fasteners.
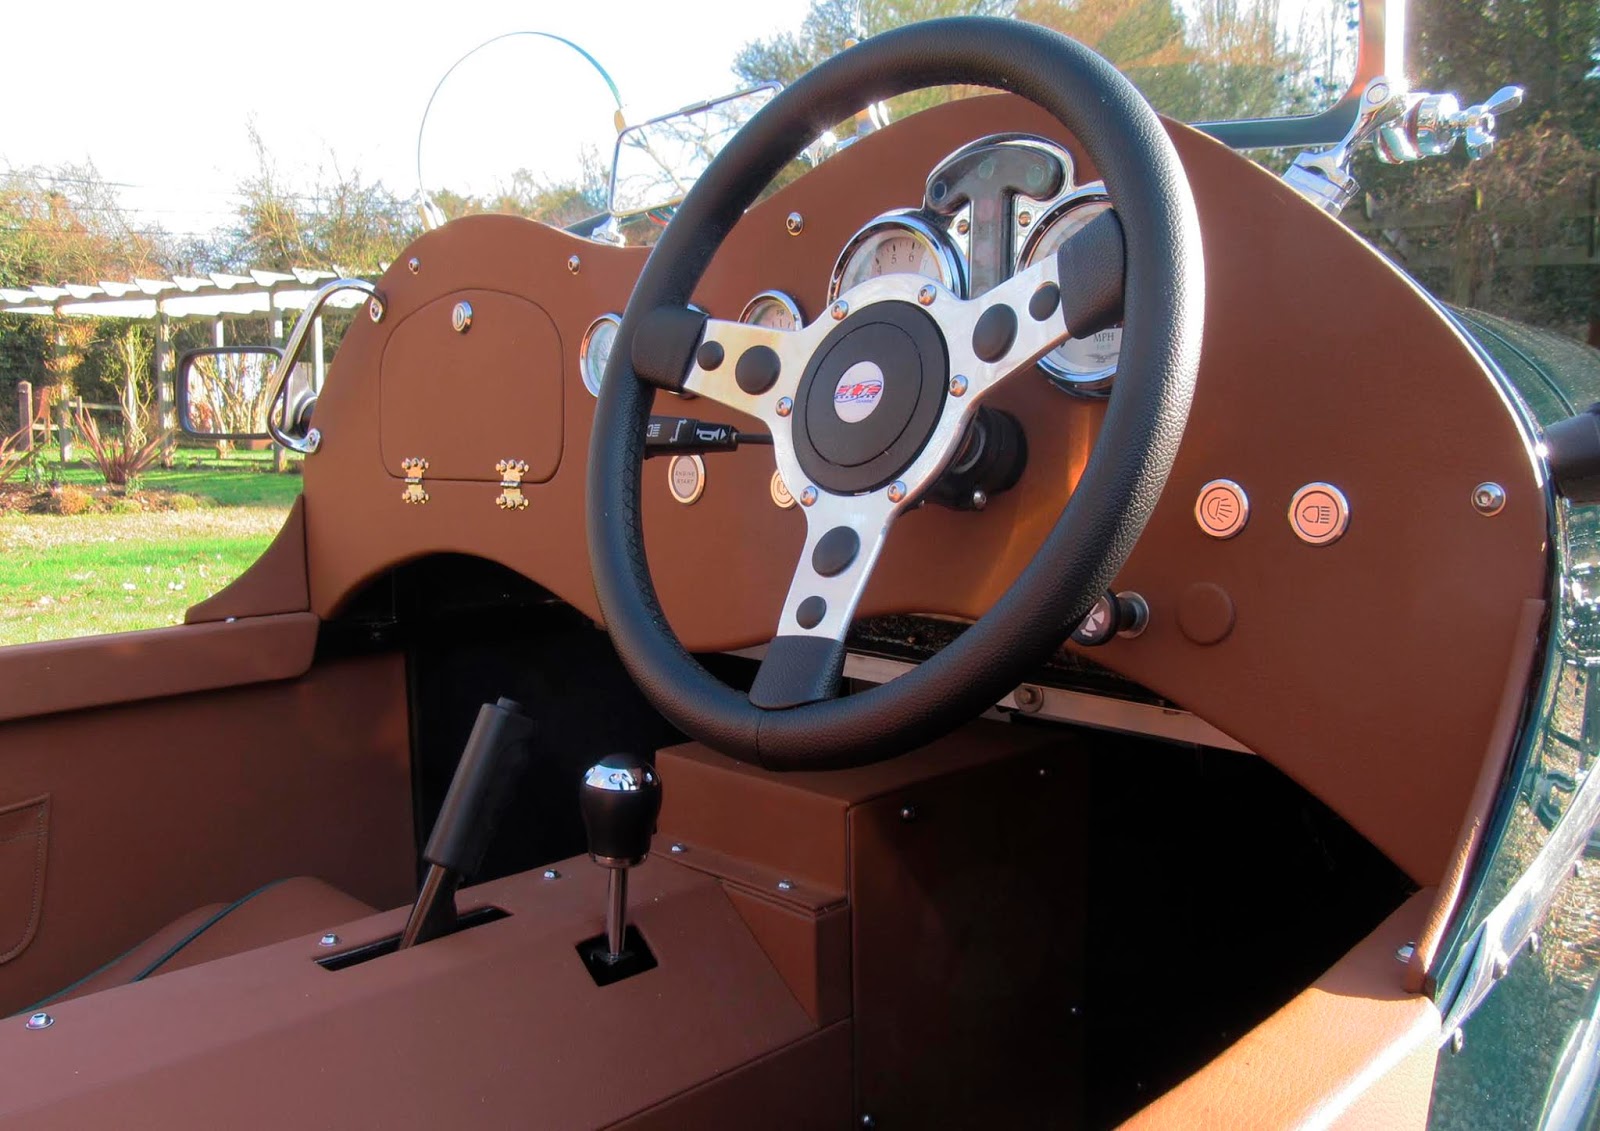
Dashboard and interior close up. The steering wheel could be changed for a vintage styled Motalita type. The reversing gearbox lever is out of shot.

Front end shot. Note that the client has infilled the nose cone with chequered mesh. Note the "propellor" motif aluminium sheet fitted to the front of the scuttle and the fuel tank from the same material. I was inspired by the underbonnet area of many Bugattis, though there are generally "engine turned" alloy.

Front end again, louvres a plenty.

Forward looking interior shot, note detail.

The client is a stickler for detail and moved the aero screens closer to the dashboard than I normally do, and this was very simple indeed. He did this by raising the aero screen plinths on small alloy spacers.

Alloy spacers to raise the aero screens over the scuttle hums, thus moving them closer to the driver and therefore higher. Though doubled, I shall have some laser cut.

Here it can be seen that the client doubled up with spacers on the outer fitment and just a single one on the inner fitment.

Detail!

Nice front end shot. Note the polished rocker covers. On later engines in the 2000s, these covers are often painted grey.

The client made some superb armrests.

Not just a nice touch, but makes access/egress easier as we age!

Louvres again plus detail in the bonnet catch fittings, stainless steel main side panel rivets, polished alloy exhaust side clamps, and polished trim pieces. The client had his panels painted off the car, fitting the main side panels once painted, hence the stainless rivets. Talking of rivets, I recommend using 4.8mm rivets for the outer panels as the heads are almost identical in diameter to 5mm socket button head screws, and just look so much better and neater.

Overhead front view, showing very pleasant detail all round.

Front wishbone set up. Note top wishbone spacers allowing the wishbone to sit rearwards thus allowing 6.5 degrees of castor.

Stainless steel tie bar, add badges to it...after the MSVA test pass only!

The eagle spreads its wings.

1064cc V-Twin 90 degree engine.

Polished rocker covers, note the client modified "knee protector".

Front bulkhead panel.

Big pots!

MG TA style wheels with MG hex spinners....you can change these for eared spinners after the UK MSVA test.

Front end, note indicators that I fit to the headlight bowls. Quite a complicated fitment, but it ensures that all lighting wiring goes into one place only.

Bonnet catches, stainless steel rivets, exhaust side clamps. Thats it folks, get your wallet out, and order a kit!
2020 tacoma grill We are really grateful for your blog post. You will find a lot of approaches after visiting your post. I was exactly searching for. Thanks for such post and please keep it up. Great work.
ReplyDeleteradiators A very awesome blog post. We are really grateful for your blog post. You will find a lot of approaches after visiting your post.
ReplyDeletebrass radiator I am impressed. I don't think Ive met anyone who knows as much about this subject as you do. You are truly well informed and very intelligent. You wrote something that people could understand and made the subject intriguing for everyone. Really, great blog you have got here.
ReplyDeletePretty good post. I just stumbled upon your blog and wanted to say that I have really enjoyed reading your blog posts. Any way I'll be subscribing to your feed and I hope you post again soon. Big thanks for the useful info. lhd machine in mining
ReplyDelete